I have taught Linux administration to people who already keep networks and office servers running, and the pattern is the same: reading about commands does not stick, typing them on a machine you may break does. This guide has fourteen short sections, each with a lab and a checkpoint, then a capstone. Break things in the virtual machine, not at work.
Every lab runs on Ubuntu Server 26.04 LTS, the current long-term support release. I checked the Ubuntu Server download page and the 26.04 release archive: the current point release is 26.04.1, supported for five years of standard security updates. The topics follow what the main syllabi cover: the LPI Linux Essentials and LPIC-1 objectives, the Red Hat RHCSA (EX200) objectives, and the Linux Foundation LFCS domains. I also lean on the Ubuntu Server documentation. Linux Journey is a good free companion.
Lines starting with $ are what you type. Blocks labelled Example output show the shape of what you should see. Your names, sizes, dates and addresses will differ.
1. What a system administrator does
A system administrator keeps computers and the services on them available, secure and recoverable. That one sentence hides a lot of ordinary work:
- Install and configure servers and software.
- Manage accounts and access.
- Patch on a schedule, with a way back.
- Monitor disk, memory, services and logs.
- Back up and restore, and prove the restore works.
- Secure: firewall, SSH, least privilege.
- Document so the next person, often you in six months, can follow.
A normal day is small things: a user locked out, a disk at 90 percent, an expiring certificate, a patch window, a slow web app. The skills that matter are the command line, networking basics, reading logs, and changing one thing at a time.
In Uganda and East Africa, Linux administrators work in banks, telecoms, government agencies, universities, ISPs, hosting companies and increasingly cloud and DevOps teams. A first job is often IT support or junior sysadmin, and Linux skills plus one certification give you an edge. Check current local listings to see what employers ask for.
I tell every group: the best administrators are not the ones who memorise the most flags. They read the error message, check the logs, and write down what they changed.
Lab
Open the syllabi linked above and list five topics you know and five that are new. You will revisit the list in the reflection.
Checkpoint
Name three recurring responsibilities of a sysadmin.
Any three of: patching, backups, account management, monitoring, security hardening, documentation.
Why is documentation part of the job?
Because systems outlive the person who built them, and recovery at 2 a.m. depends on written steps.
Why do I say to change one thing at a time?
If something breaks you know which change caused it, and you can undo only that.
2. What Linux is
Strictly, Linux is a kernel: the core that talks to the hardware, schedules processes, manages memory and enforces permissions. A distribution (distro) bundles that kernel with the GNU tools, a package manager, an init system, default settings and a release policy. When people say "I run Linux" they mean a distro.
Linux is open source, so anyone can read, modify and redistribute it under licences such as the GPL. It runs most web servers, Android phones, routers and supercomputers. Servers favour it because it is stable, scriptable, has no per-server licence fee and is easy to manage over SSH.
| Family | Examples | Package tool |
|---|---|---|
| Debian | Debian, Ubuntu, Mint | apt, dpkg |
| Red Hat | RHEL, Rocky, AlmaLinux, Fedora | dnf, rpm |
| SUSE | openSUSE, SLE | zypper |
| Arch | Arch Linux | pacman |
Learn one family well. The concepts transfer; the package tool and a few paths change. Rocky and AlmaLinux are free RHEL-compatible rebuilds. Sites: Debian, Rocky Linux, AlmaLinux, Fedora, openSUSE, Arch.
Lab
Once your VM runs (next section), run cat /etc/os-release (distro) and uname -r (kernel). Write both down.
Checkpoint
Kernel or distro: what is Ubuntu?
A distro. It ships the Linux kernel plus tools, packages and defaults.
Which package tool does Rocky Linux use?
dnf (with rpm underneath).
Name two reasons servers use Linux.
Stability and remote scriptability, plus no per-server licence cost.
3. Lab setup: your own Ubuntu Server
Enable virtualisation in the BIOS or UEFI, and have about 8 GB RAM and 30 GB free disk. Install a hypervisor: VirtualBox (free) or VMware Workstation or Fusion (check the current licence terms). I use VirtualBox below. Download ubuntu-26.04.1-live-server-amd64.iso (about 2.7 GB) from the download page. Check the download against the SHA256SUMS file in the release folder:
# Linux or macOS
$ sha256sum ubuntu-26.04.1-live-server-amd64.iso
# Windows PowerShell
> Get-FileHash .\ubuntu-26.04.1-live-server-amd64.iso -Algorithm SHA256| Setting | Value | Why |
|---|---|---|
| Name / type | ubuntu-lab, Linux, Ubuntu (64-bit) | Tick "Skip Unattended Installation". |
| CPU / RAM | 2 vCPU, 2048 MB | Enough for text mode. |
| Disk | 25 GB, dynamic | Grows as used. |
| Network | Adapter 1 NAT, Adapter 2 Host-only | Internet, plus a stable lab address. |
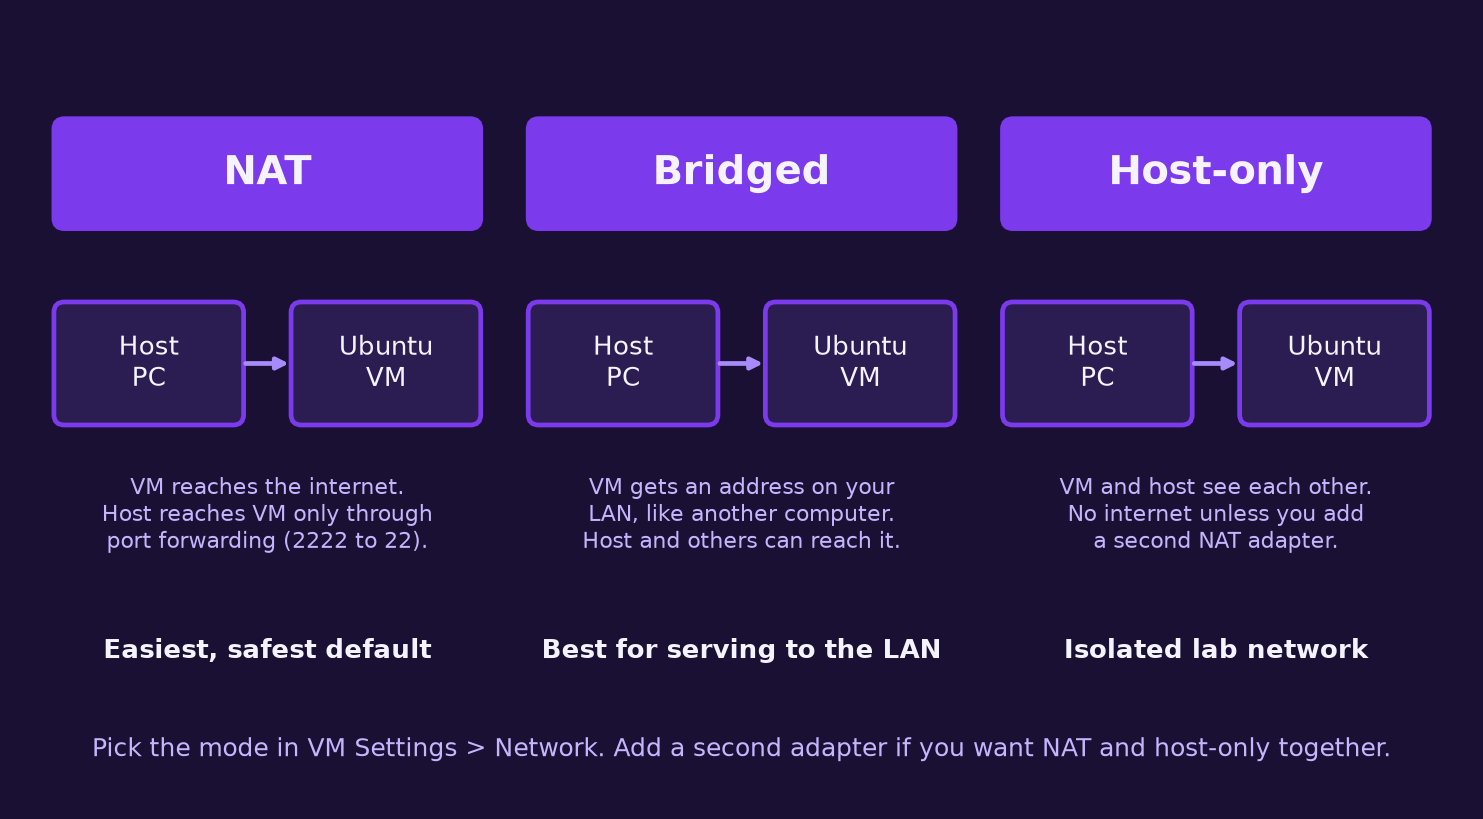
Installer choices: language and keyboard; Ubuntu Server (not minimized); accept DHCP; no proxy; default mirror; guided storage on the whole disk; your admin user and a server name such as ubuntu-lab; skip Ubuntu Pro; tick Install OpenSSH server; skip featured snaps. Reboot and remove the ISO when asked. See the official tutorial for screenshots.
Log in at the console, check your addresses, and take a snapshot (VirtualBox: Machine, Take Snapshot).
$ ip -br a
$ hostnamectl
Example output:
lo      UNKNOWN  127.0.0.1/8 ::1/128
enp0s3  UP       10.0.2.15/24
enp0s8  UP       192.168.56.101/24
To SSH from your computer, use the host-only address (ssh admin@192.168.56.101) or a NAT port forward (Settings, Network, Adapter 1, Advanced, Port Forwarding: host 127.0.0.1 port 2222 to guest port 22) and run:
$ ssh -p 2222 admin@127.0.0.1Lab
Build the VM, install Ubuntu Server 26.04.1, tick OpenSSH, take a snapshot named clean-install, and log in over SSH from your host. Screenshot the SSH session showing hostnamectl.
Checkpoint
Which network mode lets the VM reach the internet with no extra setup?
NAT.
Why snapshot before experiments?
You can roll the whole VM back if you break it.
Which package option gives you remote login after install?
OpenSSH server, ticked in the installer.
4. The shell and the filesystem
The default on Ubuntu is bash. The prompt looks like this:
admin@ubuntu-lab:~$That is user admin on host ubuntu-lab, in ~ (your home directory). A $ means a normal user and a # means root. Ubuntu 26.04 ships Rust rewrites of some core tools (uutils coreutils, and sudo-rs instead of classic sudo). You will rarely notice, and the Ubuntu documentation lists the differences.
$ pwd              # where am I
$ ls               # list files
$ ls -lah          # long format, hidden files, human sizes
$ cd /var/log      # absolute path (starts with /)
$ cd ..            # up one level
$ cd ~             # home. Plain 'cd' does the same
$ cd -             # back to the previous directory
An absolute path starts at / and works from anywhere. A relative path starts from where you are. There is one tree with one root, laid out by the Filesystem Hierarchy Standard.
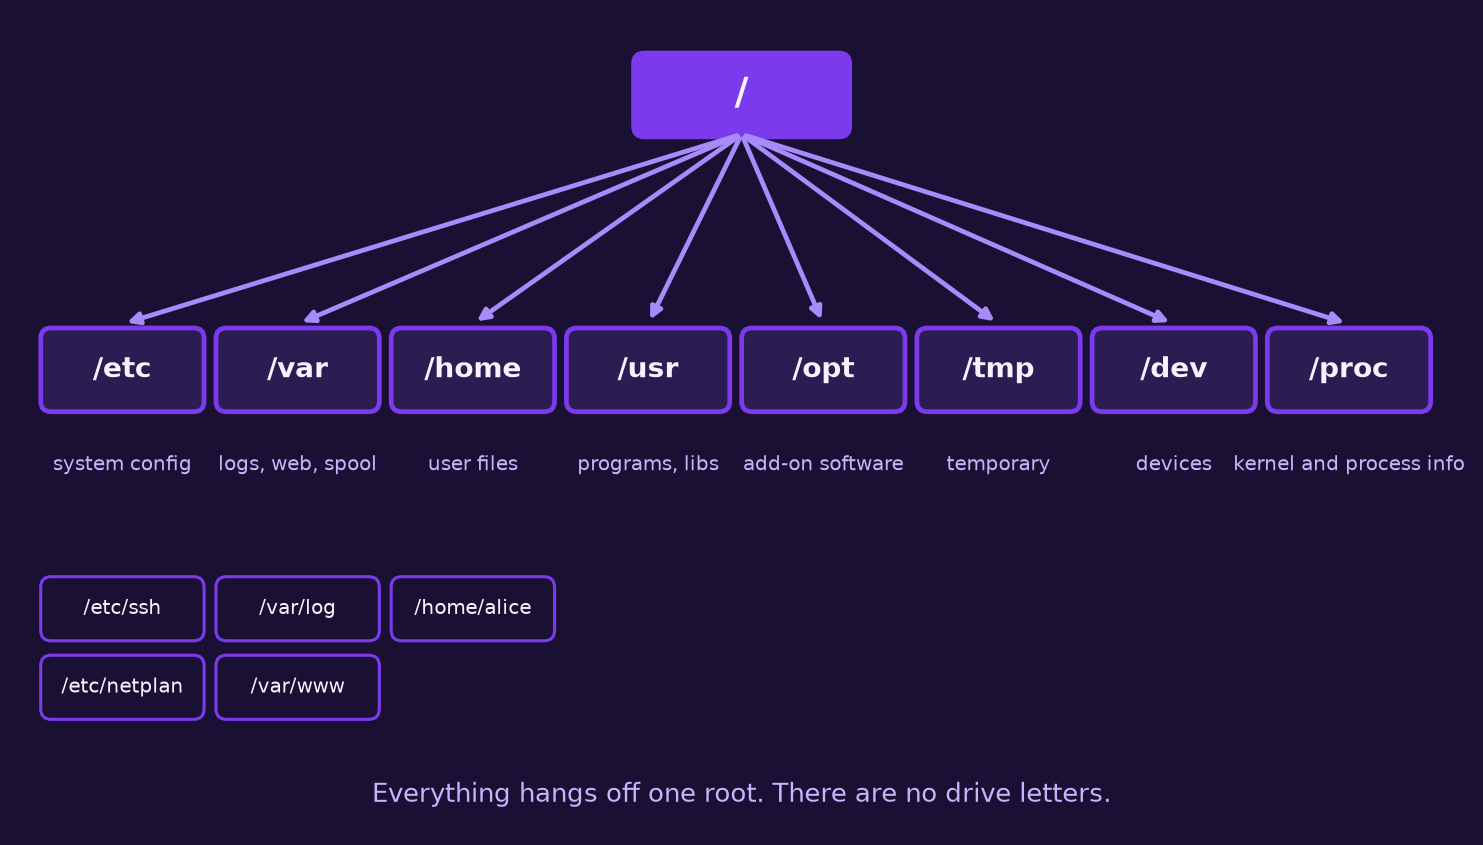
| Path | What lives there |
|---|---|
/etc | System configuration (text files) |
/var | Variable data: logs in /var/log, websites in /var/www, backups |
/home | User home directories |
/usr | Installed programs and libraries |
/opt | Optional third-party software |
/tmp | Temporary files, cleared on reboot |
/dev | Device files such as /dev/sda |
/proc | Live kernel and process information |
Getting help matters most:
$ man ls            # manual page. q to quit, / to search
$ ls --help | less  # short usage
$ whatis chmod      # one-line description
tldr shows community cheat sheets (tldr.sh). Press Tab to complete names, Ctrl+R to search history, and use history and !! (repeat the last command).
Lab
Run cd / then ls. Visit each directory in the table. Then from your home directory reach /var/log using a relative path.
Checkpoint
What is the difference between /home/admin and home/admin?
The first is absolute. The second is relative to the current directory.
Where would you look for a configuration file?
/etc.
How do you read a command's manual?
man command, then q to leave.
5. Working with files and text
$ mkdir -p projects/web projects/notes   # -p creates parents
$ touch projects/notes/todo.txt            # empty file
$ cp todo.txt todo.bak                     # copy
$ mv todo.bak old/                         # move or rename
$ rm -r projects                           # delete a tree. No recycle bin!
There is no undo for rm. Read the command twice before you press Enter, especially with -r and wildcards. To read files:
$ cat file          # print all
$ less file         # page through. q to quit
$ head -n 3 file    # first 3 lines
$ tail -f file      # follow as it grows (Ctrl+C to stop)
$ wc -l file        # count lines
For editing, nano is the friendly start: type, Ctrl+O Enter to save, Ctrl+X to exit. vim is on nearly every server, so learn the survival kit: i to insert, Esc, then :wq to save and quit or :q! to quit without saving.
Pipes and redirection are where the shell gets powerful. Every program has input (stdin), output (stdout) and errors (stderr).
$ printf 'alpha\nbeta\nalpha\ngamma\nalpha\nbeta\n' > words.txt   # > overwrite, >> append
$ grep -n alp words.txt          # lines matching, with numbers
$ grep -v alpha words.txt        # lines NOT matching
$ sort words.txt | uniq -c | sort -nr    # frequency count
$ cut -d: -f1,7 /etc/passwd | head -3    # fields 1 and 7 split on :
$ ls /nonexistent 2> err.txt     # send errors to a file
$ ls /nonexistent 2>&1 | wc -l   # errors into the pipe
Example output:
      3 alpha
      2 beta
      1 gamma

root:/bin/bash
daemon:/usr/sbin/nologin
bin:/usr/sbin/nologin
$ find /var/log -name '*.log' -mtime -1 # modified in the last day
$ tar -czf backup.tgz projects # create compressed archive
$ tar -tzf backup.tgz # list contents
$ tar -xzf backup.tgz -C /tmp/restore # extract elsewhere
$ ln file hard # hard link: same data
$ ln -s file soft # symbolic link: a pointertar flags: c create, x extract, t list, z gzip, f filename. A hard link shares the original's inode (ls -li shows it); a symlink points at a path and breaks if the target moves.
Lab
In a new directory, create words.txt, produce the frequency count, archive the directory with tar, delete it, and restore it.
Checkpoint
Difference between > and >>?
> overwrites the file, >> appends.
Which command counts how many lines contain "error" in app.log?
grep -c error app.log.
What does 2>&1 do?
Sends stderr to wherever stdout is going.
6. Users, groups and permissions
Every file belongs to a user and a group, and every process runs as a user. The core files are plain text:
| File | Holds |
|---|---|
/etc/passwd | Accounts: name, UID, GID, home, shell. Readable by all. |
/etc/shadow | Password hashes. Root only. |
/etc/group | Groups and members. |
$ sudo adduser alice               # interactive, creates home dir
$ sudo passwd alice                # change her password
$ sudo usermod -aG sudo alice      # add to the sudo group. -a matters!
$ id alice                         # UID, GID, groups
$ sudo deluser --remove-home alice # delete the user and home
Example output:
uid=1001(alice) gid=1001(alice) groups=1001(alice),27(sudo)useradd is the low-level tool and needs flags (-m, -s /bin/bash); adduser is friendlier. sudo lets an authorised user run one command as root. Its rules live in /etc/sudoers and /etc/sudoers.d/, and you edit them only with visudo, which checks syntax before saving.
$ sudo visudo -f /etc/sudoers.d/webadmin
# add one line, for example:
webadmin ALL=(ALL) ALL
Remember that Ubuntu 26.04 uses sudo-rs by default. Rules like this work, but test them with sudo -l -U webadmin.
Permissions. ls -l shows the file type, then read, write and execute for owner, group and others.
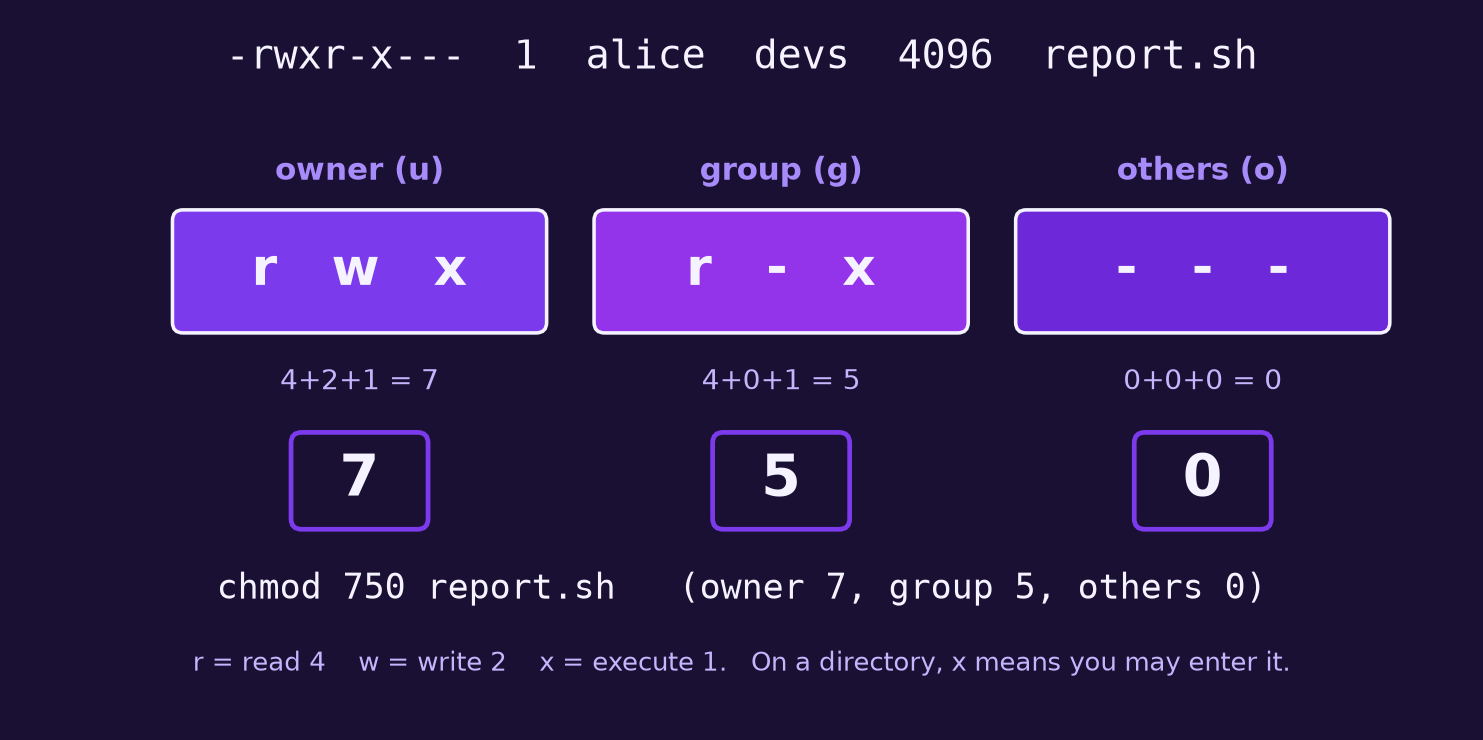
$ chmod 640 file            # rw- r-- ---
$ chmod u+x,g-r file         # symbolic: add x for owner, remove r from group
$ chown alice:devs file      # change owner and group
$ umask                      # default mask
$ stat -c '%a %U:%G %n' file # show octal, owner, group
Example output:
-rw-r----- 1 alice devs 0 Oct 15 05:35 file
640 alice:devs file
0022
On a directory, x means you can enter it and w lets you create or delete files in it. The umask removes bits from new files: 022 gives files 644 and directories 755. setuid (the s in -rwsr-xr-x on /usr/bin/passwd) runs a program as its owner, which lets users change their own password. setgid on a directory (chmod 2770) makes new files inherit the group, which is ideal for shared folders. Audit setuid programs (section 12).
The principle behind all of it is least privilege: give each person and service only the access needed. Work as a normal user and use sudo per command, not a root shell.
Lab
$ sudo groupadd devs
$ sudo adduser alice
$ sudo adduser bob
$ sudo usermod -aG devs alice && sudo usermod -aG devs bob
$ sudo mkdir /srv/shared
$ sudo chgrp devs /srv/shared
$ sudo chmod 2770 /srv/shared
$ sudo -u alice touch /srv/shared/a.txt
$ ls -l /srv/shared
Check that bob can read alice's file and a third user cannot enter the directory. Then delete both users.
Checkpoint
What does chmod 750 mean?
Owner rwx, group r-x, others none.
Why use visudo?
It validates syntax so you do not break sudo.
Which file holds password hashes?
/etc/shadow, readable only by root.
7. Packages and software
Software on Debian and Ubuntu comes as .deb packages from repositories, handled by apt (which resolves dependencies) on top of dpkg (which installs single packages). Repositories are listed in /etc/apt/, split into components: main, universe, restricted and multiverse.
$ sudo apt update                 # refresh package lists
$ sudo apt upgrade                # apply upgrades
$ sudo apt install htop           # install
$ apt search web server           # search
$ sudo apt remove htop            # remove, keep config
$ sudo apt purge htop             # remove and delete config
$ sudo apt autoremove             # clear unneeded dependencies
$ dpkg -l | grep nginx            # installed packages
$ dpkg -S /usr/bin/rsync          # which package owns a file
Example output:
rsync: /usr/bin/rsyncAlways run apt update before installing, or you may get stale versions. Ubuntu also ships snap packages (snap list, sudo snap install name), which bundle their dependencies. Ubuntu 26.04 includes APT 3.2, which adds transaction history commands such as apt history-list; see man apt before relying on them.
Automatic security updates are a sensible default:
$ sudo apt install unattended-upgrades
$ sudo dpkg-reconfigure -plow unattended-upgrades
Coming from the Red Hat family, here are the equivalents:
| Task | Ubuntu / Debian | Rocky / Alma / RHEL / Fedora |
|---|---|---|
| Refresh metadata | apt update | dnf check-update |
| Upgrade all | apt upgrade | dnf upgrade |
| Install | apt install pkg | dnf install pkg |
| Remove | apt remove pkg | dnf remove pkg |
| Installed list | dpkg -l | rpm -qa |
| Which package owns a file | dpkg -S /path | rpm -qf /path |
Lab
Run sudo apt update && sudo apt upgrade, install htop and tree, find the owner of /usr/bin/htop with dpkg -S, remove both, and enable unattended-upgrades.
Checkpoint
Difference between apt remove and apt purge?
Purge also deletes configuration files.
Why run apt update first?
It refreshes the package lists so apt knows current versions.
Which command finds the package that owns a file?
dpkg -S /path.
8. Processes and services
A process is a running program with a PID. A service (daemon) is a process managed in the background by systemd, which is PID 1 and starts everything else at boot.
$ ps aux | head -5            # all processes
$ top                          # live view. q to quit
$ htop                         # friendlier, from apt
$ sleep 300 &                  # run in the background
$ jobs                         # list background jobs
$ kill 12345                   # polite stop (SIGTERM)
$ kill -9 12345                # force stop (SIGKILL), last resort
Try kill (SIGTERM) first so the program can clean up, and -9 only when it ignores you. Now services, with nginx as the example because the capstone needs it.
$ sudo apt install -y nginx
$ systemctl status nginx --no-pager
$ curl -I http://localhost
$ sudo systemctl stop nginx
$ sudo systemctl start nginx
$ sudo systemctl restart nginx    # stop then start
$ sudo systemctl reload nginx     # re-read config without dropping connections
$ sudo systemctl enable nginx     # start at boot
$ systemctl cat nginx             # show its unit file
$ sudo nginx -t                   # test the config before reload
Example output:
● nginx.service - A high performance web server and a reverse proxy server
     Loaded: loaded (/usr/lib/systemd/system/nginx.service; enabled; preset: enabled)
     Active: active (running) since Thu 2026-10-15 09:12:01 EAT; 2min ago
start and stop act now. enable and disable control boot. They are independent, which trips up everyone once. Package unit files live in /usr/lib/systemd/system/, yours in /etc/systemd/system/.
Scheduling. Classic cron uses five time fields then a command: minute, hour, day of month, month, day of week.
$ crontab -e      # edit your jobs
$ crontab -l      # list them
# m  h  dom mon dow  command
30 2  *   *   *    /usr/local/bin/backup.sh >> /var/log/backup.log 2>&1
The same job as a systemd timer needs two files. Persistent=true runs a missed job after downtime, and output goes to the journal.
# /etc/systemd/system/backup.service
[Service]
Type=oneshot
ExecStart=/usr/local/bin/backup.sh

# /etc/systemd/system/backup.timer
[Timer]
OnCalendar=*-*-* 02:30:00
Persistent=true
[Install]
WantedBy=timers.target
$ sudo systemctl daemon-reload
$ sudo systemctl enable --now backup.timer
$ systemctl list-timersLab
Install nginx, stop it, confirm curl fails, start it, confirm it works, then disable it and reboot to see it stay off. Re-enable it. Start sleep 600 & and stop it with kill.
Checkpoint
Difference between enable and start?
start runs it now. enable makes it start at boot.
Why prefer reload to restart for nginx?
It applies config without dropping active connections.
How do you see why a service failed?
systemctl status name and journalctl -u name.
9. Disks and storage
Linux names disks /dev/sda, /dev/sdb and so on, with partitions numbered after them (/dev/sda1). NVMe disks look like /dev/nvme0n1p1. A disk gets a partition table (GPT), partitions get a filesystem (ext4 is the Ubuntu default, XFS the RHEL default), and a filesystem is mounted at a directory.
$ lsblk -f              # disks, partitions, filesystems, UUIDs
$ df -hT                # used and free space per filesystem
$ du -sh /var/* 2>/dev/null | sort -h | tail -5   # biggest directories
$ sudo blkid            # UUIDs
Example output:
NAME   FSTYPE LABEL UUID        MOUNTPOINTS
sda
├─sda1 vfat         1A2B-3C4D   /boot/efi
└─sda2 ext4         9f3c...e1   /
sdb
LVM (Logical Volume Manager) puts a flexible layer between disks and filesystems: physical volumes join a volume group, and you carve logical volumes out of it and can grow them online. Check yours with sudo pvs, sudo vgs, sudo lvs.
Adding a virtual disk. Shut the VM down, add a 2 GB disk in VirtualBox (Settings, Storage, Add Hard Disk), and boot. Run lsblk and use the right device name: partitioning the wrong disk destroys data.
$ lsblk
$ sudo parted -s /dev/sdb mklabel gpt mkpart data ext4 1MiB 100%
$ sudo mkfs.ext4 -L data /dev/sdb1
$ sudo mkdir /mnt/data
$ sudo mount /dev/sdb1 /mnt/data
$ df -h /mnt/data
$ sudo blkid /dev/sdb1               # copy the UUID
To mount at boot, add a line to /etc/fstab using the UUID, not the device name (names can change). nofail stops a missing disk from blocking boot. Test before rebooting:
$ sudo nano /etc/fstab
UUID=PASTE-YOUR-UUID-HERE  /mnt/data  ext4  defaults,nofail  0  2

$ sudo systemctl daemon-reload
$ sudo umount /mnt/data
$ sudo mount -a                       # mounts everything in fstab
$ findmnt /mnt/data
A typo in fstab can drop you into emergency mode at boot, so run sudo mount -a first. Optional LVM on a second new disk /dev/sdc: sudo pvcreate /dev/sdc, sudo vgcreate vg_data /dev/sdc, sudo lvcreate -L 1G -n lv_web vg_data, then sudo lvextend -r -L +500M /dev/vg_data/lv_web grows the volume and filesystem together.
Lab
Add the disk, partition, format and mount it, make the mount persistent, reboot, and prove it with findmnt /mnt/data.
Checkpoint
Why use a UUID in fstab?
Device names such as sdb can change between boots.
What does df show versus du?
df shows filesystem space. du shows how much a directory uses.
What do you do after editing fstab?
Run sudo mount -a to test it before rebooting.
10. Networking basics
$ ip -br a                 # interfaces and addresses
$ ip route                 # routing table. 'default via' is the gateway
$ hostnamectl              # hostname and OS
$ ss -tulpn                # listening TCP/UDP ports and their programs
$ ping -c 4 1.1.1.1        # reachability
$ curl -I https://ubuntu.com   # fetch headers only
$ dig +short ubuntu.com    # DNS lookup (package bind9-dnsutils)
Example output:
default via 10.0.2.2 dev enp0s3 proto dhcp src 10.0.2.15 metric 100
192.168.56.0/24 dev enp0s8 proto kernel scope link src 192.168.56.101
DNS settings are in /etc/resolv.conf, which on Ubuntu points to the local resolver at 127.0.0.53 (systemd-resolved). Configure DNS in netplan, not by hand. Ubuntu Server configures networking with netplan, YAML files in /etc/netplan/. Here is a static address on the host-only adapter. I leave the NAT adapter on DHCP so the VM keeps its internet.
# /etc/netplan/60-lab.yaml  (YAML is strict about spaces. Use no tabs)
network:
  version: 2
  ethernets:
    enp0s8:
      dhcp4: false
      addresses: [192.168.56.10/24]
$ sudo chmod 600 /etc/netplan/60-lab.yaml
$ sudo netplan try # applies, then reverts in 120 s unless you confirm
$ ip -br a show enp0s8Use your real interface name from ip -br a. netplan try is the safe way to change networking remotely.
Firewall with ufw. Allow SSH before you enable it, or you lock yourself out.
$ sudo ufw allow OpenSSH
$ sudo ufw allow 80/tcp
$ sudo ufw enable
$ sudo ufw status verbose
SSH keys are safer than passwords. Generate a key on your own computer and copy the public half to the server:
$ ssh-keygen -t ed25519 -C "admin@lab"
$ ssh-copy-id admin@192.168.56.10
$ ssh admin@192.168.56.10          # should not ask for the server password
Only after key login works in one terminal, harden the daemon. Put your settings in a drop-in file that sorts first, because sshd uses the first value it finds for a setting, and other files in /etc/ssh/sshd_config.d/ may already set PasswordAuthentication.
# /etc/ssh/sshd_config.d/00-hardening.conf
PasswordAuthentication no
PermitRootLogin no
MaxAuthTries 3
$ sudo sshd -t # syntax check, silent if OK
$ sudo sshd -T | grep -E 'passwordauthentication|permitrootlogin'
$ sudo systemctl restart ssh # the service is 'ssh' on Ubuntu
# keep your current session open, and test a NEW login in another terminalLab
Add the static host-only address, set up key login, apply the hardening file, and confirm in a second terminal that password login is refused. Keep a console session open to revert.
Checkpoint
Which command shows listening ports?
ss -tulpn.
Why netplan try instead of apply?
It reverts automatically if the change cuts you off.
What must you allow before enabling ufw over SSH?
SSH (sudo ufw allow OpenSSH).
11. Logs, monitoring and troubleshooting
Most service logs are collected by systemd's journal and read with journalctl. Many programs also write text files under /var/log, such as /var/log/nginx/access.log and /var/log/apt/history.log. Files such as syslog and auth.log exist only if rsyslog is installed, so check ls /var/log and use the journal either way.
$ sudo journalctl -u nginx --since "1 hour ago"
$ sudo journalctl -u ssh -f                 # follow live
$ sudo journalctl -p err -b                 # errors since this boot
$ sudo journalctl -u ssh | grep 'Failed password'
$ last -n 5                                 # recent logins
logrotate keeps text logs from filling the disk by rotating and compressing them. Its main file is /etc/logrotate.conf and per-application rules sit in /etc/logrotate.d/. Test a configuration with a dry run, which changes nothing:
$ sudo logrotate -d /etc/logrotate.conf

# /etc/logrotate.d/myapp
/var/log/myapp/*.log {
    weekly
    rotate 4
    compress
    missingok
    notifempty
}
A troubleshooting method keeps you calm when something is down:
- Check: what is failing, since when, for whom? Read
systemctl statusand the logs first. - Isolate: service, network, disk, permissions or config?
ss -tulpn,df -h,ping,curl localhostnarrow it. - Fix: one reversible change. Test config with
nginx -torsshd -t. - Verify: confirm from the user's side.
- Document: what broke, why, what you changed.
I wrote a shorter companion on this: When a service is down, read three things before you restart it.
Lab
Break nginx on purpose: back up /etc/nginx/sites-available/default, add a bad line, run sudo systemctl reload nginx, and read the error in journalctl -u nginx. Repair it using nginx -t and write the five-step record.
Checkpoint
Where do you read logs for one service?
journalctl -u servicename.
Which flag follows a log live?
-f.
What does a logrotate dry run do?
Shows what would happen without changing files (-d).
12. Backup and security basics
A backup you have never restored is a hope, not a backup. Two simple tools:
$ rsync -a --delete src/ dst/                  # mirror; trailing slash on src matters
$ rsync -a --dry-run --itemize-changes src/ dst/   # preview only
$ sudo tar -czf /var/backups/etc-$(date +%F).tgz /etc   # dated archive
rsync -a keeps permissions and copies only changes. --delete makes an exact mirror, so use --dry-run first. For history, keep several dated tar archives, on another disk or machine.
Security basics are habits you have already built: updates, only the ports you need, key login with no root over SSH, least privilege, and a regular look at what is running.
$ sudo apt install fail2ban                # bans IPs with repeated failed logins
$ sudo systemctl enable --now fail2ban
$ sudo fail2ban-client status sshd
$ sudo find / -xdev -perm -4000 -type f 2>/dev/null   # setuid programs
Fail2ban helps but does not replace key-only SSH. For deeper auditing see auditd. My post Five server hardening steps every admin should know goes further.
Lab
Create ~/site-test with a few files, back it up with a dated tar into ~/backups, delete the originals, restore elsewhere, and compare with diff -r. Repeat with rsync and a deleted file to watch --delete work.
Checkpoint
Why test restores?
Because only a successful restore proves the backup is usable.
What does a trailing slash on the rsync source do?
It copies the directory's contents, not the directory itself.
Name three basic hardening steps.
Updates, firewall, key-only SSH with no root login, least privilege.
13. Shell scripting starter
A script is a text file of commands. Start with a shebang, make it executable, and run it. Variables have no spaces around =; use "$var" with quotes.
#!/usr/bin/env bash
set -euo pipefail          # stop on errors, unset variables, pipe failures

THRESHOLD=80
usage=$(df --output=pcent / | tail -1 | tr -dc '0-9')

if [ "$usage" -ge "$THRESHOLD" ]; then
  echo "WARN: / is ${usage}% full"
  exit 1
fi
echo "OK: / is ${usage}% full"

for svc in ssh cron; do
  if systemctl is-active --quiet "$svc"; then
    echo "$svc: running"
  else
    echo "$svc: NOT running"
  fi
done
$ nano healthcheck.sh
$ chmod +x healthcheck.sh
$ ./healthcheck.sh
$ echo "exit code: $?"
$ bash -n healthcheck.sh # syntax check without runningExample output:
OK: / is 15% full
ssh: running
cron: running
exit code: 0
Every command returns an exit code: 0 is success, anything else is failure. $? holds the last one, and if, && and || act on it.
Here is the backup script for the capstone. Save it as /usr/local/bin/backup.sh and make it executable with sudo chmod 755.
#!/usr/bin/env bash
set -euo pipefail
SRC=/var/www/html
DEST=/var/backups/site
KEEP=7
mkdir -p "$DEST"
STAMP=$(date +%F_%H%M)
tar -czf "$DEST/site-$STAMP.tar.gz" -C "$SRC" .
find "$DEST" -name 'site-*.tar.gz' -mtime +"$KEEP" -delete
echo "$(date -Is) backup ok: site-$STAMP.tar.gz"
Lab
Type in the health-check script, run it, then change THRESHOLD=5 to force the warning and confirm $? is 1. Add a third service to the loop.
Checkpoint
What does exit code 0 mean?
Success.
What does set -e do?
Stops the script when a command fails.
Why quote "$var"?
So values with spaces do not split into several arguments.
14. Where next
Pick a path by where you work. LPI Linux Essentials (exam 010-160, 40 questions, 60 minutes) is the gentlest start, then LPIC-1. RHCSA is a hands-on exam on RHEL 10 that adds SELinux, firewalld and deeper LVM. The LFCS is a two-hour hands-on online exam on operations, networking, storage, essential commands and users. Check each provider for current prices and objectives.
On this site, the course Introduction to System Administration: Fundamentals of Unix OS System Administration goes deeper on the same ground. Also read Linux commands every helpdesk technician needs.
One-page cheat sheet
| Area | Commands |
|---|---|
| Files and text | cp mv rm mkdir ln cat less head tail grep sort uniq cut wc, | > >> 2> |
| Find/archive | find, tar -czf/-xzf/-tzf, rsync -a |
| Users | adduser usermod passwd id groups, visudo |
| Permissions | chmod chown umask, ls -l stat |
| Packages | apt update/upgrade/install/remove, dpkg -l/-S |
| Processes | ps top htop kill jobs |
| Services | systemctl status/start/stop/enable/reload, journalctl -u |
| Disks | lsblk df du mount findmnt blkid, /etc/fstab |
| Network | ip -br a, ip route, ss -tulpn, ping, curl, dig, netplan |
| Firewall/SSH | ufw allow/enable/status, ssh-keygen ssh-copy-id sshd -t |
| Logs | journalctl -p err -b, /var/log, logrotate -d |
Capstone mini-project: a documented web server
Build and document a small production-style web server on a fresh VM (restore your clean-install snapshot, or build a new one). It brings every section together.
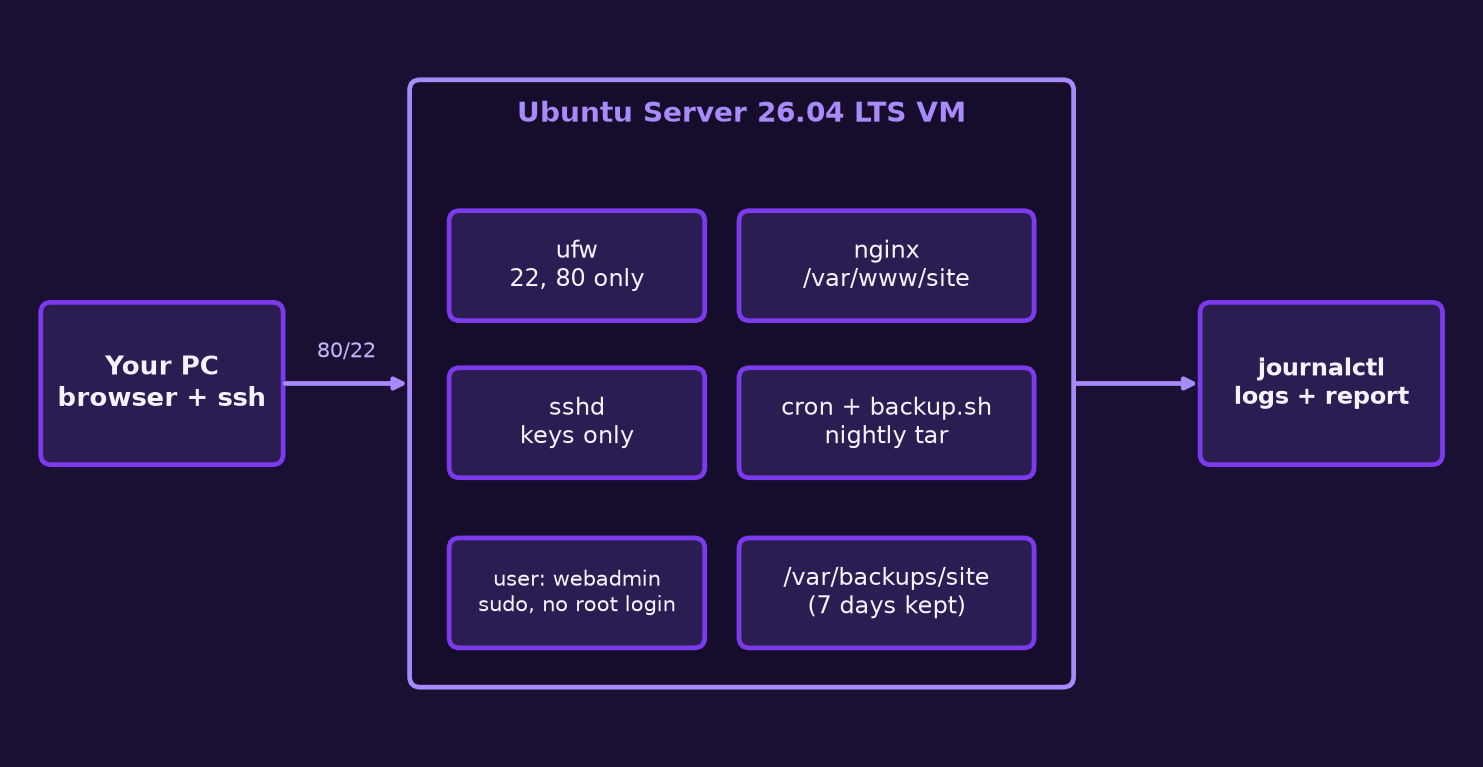
- Base. Install 26.04.1 with OpenSSH, update, set the hostname with
sudo hostnamectl set-hostname web01. - Users. Create
webadminwith sudo and use it from now on. - SSH. Key login, then the
00-hardening.conffile from section 10. Test with a second terminal. - Web. Install nginx and add
/var/www/html/index.html(withsudo tee) showing your name and the date. Confirm withcurlfrom your host. - Firewall.
ufwallowing OpenSSH and 80/tcp only. Confirm withufw status verboseandss -tulpn. - Backup. Install the section 13 script, schedule it with cron or a timer, run it once, and restore into
/tmp/restore-test. - Monitor. Run the health-check script and capture
journalctl -p err -b. - Document. Write a one-page runbook: purpose, addresses, users, ports, how to restart and restore.
Reflection and assignment
Submit a short lab report and your capstone evidence in the submit box below.
- Lab report (PDF, DOCX or MD). For sections 3 to 12, a line or two each: what you did, one command that mattered, one thing that went wrong and the fix.
- Capstone evidence. Screenshots (PNG or JPG) of SSH key login,
ufw status verbose, the web page, the cron or timer entry, a successful restore and the health-check output. Addbackup.shand your runbook (.sh,.mdor.txt). A ZIP is fine. Up to 3 files, 20 MB each. - Reflection (200 to 300 words). Use the prompts below.
- Which topic from your section 1 list moved from new to known, and why?
- What was your worst lab mistake, and what would you do differently in production?
- Which control would you apply first on a real server, and why?
- Which certification path will you try, and what is your three-month plan?
Peer critique. Read at least two other administrators' write-ups in the comments and reply to each: one thing done well, one risk or mistake, one suggestion. Refer to a command or screenshot. Be kind and exact.
Rubric (100 marks)
| Criterion | Marks | What full marks looks like |
|---|---|---|
| Capstone works | 30 | Page served, firewall 22 and 80 only, key-only SSH, restore proven |
| Evidence and documentation | 20 | Clear screenshots, script, usable runbook |
| Technical accuracy | 15 | Correct commands, outputs explained |
| Security and least privilege | 10 | Non-root admin, minimal ports |
| Troubleshooting record | 5 | One real fault, five steps |
| Reflection | 10 | Honest and specific |
| Peer critique | 10 | Two or more specific replies |
Commenting and submitting need you to be signed in with a free account.